

Created for UE4 v4.7.5
So first things first. In order to get your app on the google play store, you will of course have to set up a google play account. There is a nominal fee (like 25USD I believe), and this will let you have the basic tools for uploading and distributing your content for alpha/beta/release testing. Epic has already gone through the trouble of instructing you on how to go about this, so click here to go to the post with the instructions.
Side Note: Remember/write down the keystore file name, the keystore alias, and the keystore password for later use.
I would like to point out, however, that keeping that keystore file in a safe location with multiple backups IS A MUST. If you lose this keystore, you will have to upload your app again, except under a different name. This could potentially cause pain if you have painstakingly created a cool logo to go with the name.
Once you have your keystore file, you can now continue on to the annoyingly pointless process of setting up your store page. First is the Store Title. I want to go ahead and tell you to PICK A UNIQUE NAME. Do some research, and pick something that nobody else has picked.
Google has an advanced search algorithm that will detect infringing material and slap you with a strike against your account. Ask me how I know. To be fair, there were several un-related apps that had similar names, all from different companies, but for whatever reason they passed the litmus test. Actually, I passed the test at least 3 times before google decided to put a strike against the account. Keep in mind that this is all with a closed alpha testing session.
Furthermore, the copyright infringement extends to pictures and an ambiguously worded amount of content that they check, and there have been reports of miss-interpretation of property and false accusations of copyright infringement. If you find that your app has been "infringing," google will lock the app and you have to fix whatever infringing material your store page and/or app contains, and remove it.
So far, I haven't included any pictures in this how-to because google should have sufficient documentation on completing the forms. It also tells you where your data input is lacking, and there will be a big red marker, or a partially filled green marker indicating incomplete/partially complete sections. If there are any questions or if I missed something that is not entirely clear on this part, then let me know if you have any trouble in the comments, and I will try to help you on your way.
Also, remember to publish your app when you are done. This will not automatically dump it on the store page since it doesn't even have an alpha build, so don't worry.
So now we get into the UE4 package settings that will allow us to "ship" our package. First go to File>>PackageProject>>Package Settings in the Menu.

This will bring up the project packaging settings. You will want to check the full distribution box under project. This will make google play happy.

So next we want to adjust the android package settings, which can be found under the Platforms>>Android menu located in the same window on the left hand side.

So in this menu you will want to do a couple of things. First, create an android package name. It needs to be in the format of com.CompanyName.Project. Next, you need to fill out the store version. Last I checked there was a bug with google play and UE4 that would mess with the formatting of the store version by erasing any preceding zeroes before your desired version. The current workaround is to simply add a 1 to the beggining of the version, and fill in the rest as desired. For example, the first build sent to google play was version 10001, then the second was 10002, etc... Finally you add the version display name. If you are early in the game, something low will due, but anything that will help you and your users track version coherently will suffice.
Finally, and most importantly, you will need to uncheck the box that says "Package game data inside .apk." This is because google play limits .apk files to 50mb or less, and when you package your first couple of un-optimized projects you will likely see something like 100-300mb if you are lucky. This will also create an .obb file in your package folder that we will need later, along with your .apk file.
Next we scroll down to the "Distribution Signing" in the same window. Fill out the Keystore File name, the Key Alias and the Keystore password in the highlighted fields.
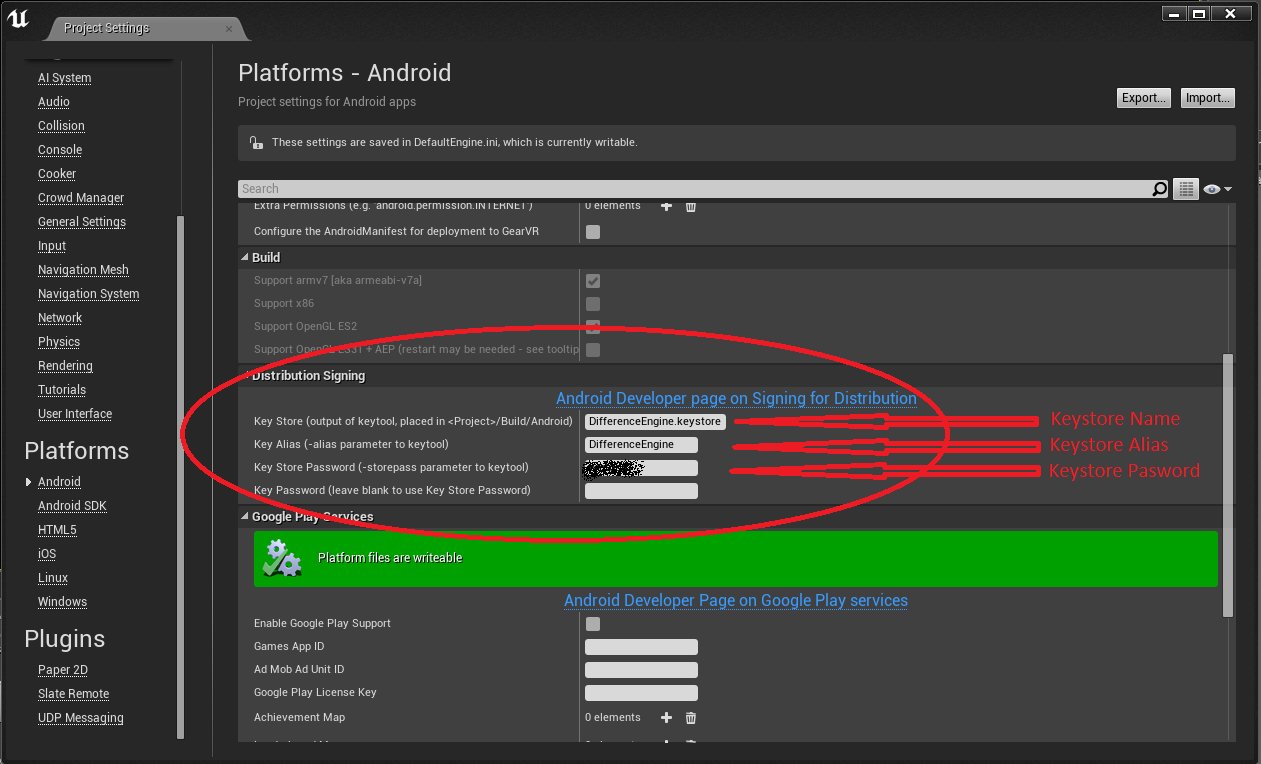
Remember that you chose the keystore file name, alias and store password when you created it at the beginning of this tutorial. You will then want to take the keystore file that you created and copy it to the following directories: MyProjectDirectory>>Intermediate>>Android>>APK and MyProjectDirectory>>Build>>Android. I am not entirely sure if it is required in both directories, but I believe I was met with some errors when the keystore was not present in both.
Next, we want to go ahead and package the project. I have not done extensive compatability tests, nor have I read anything about the various packaging options for andriod, so I typically select "all" when packaging projects. This will inflate your file sizes, but it is suitable for testing purposes, and we are already working on optimization to try and get the file size down. Once we have a concrete and reliable method of doing this, we will probably post a tutorial on the tips and tricks on accomplishing that.
So getting back on topic, the next thing you will want to do is upload an .apk file for your alpha testers. This can be found in the "APK" tab of the selected game in the google developer's console. You will want to click the "Upload new APK to Alpha" button, and go ahead and browse for your file.
Side Note: Sorry for the lack of pictures on the google play store, but I feel like there is some sensitive information present on the pages, and we would like to keep that personal. I may be able to help in more detail if you run into a problem. Just leave a message in the comments.
So once you have uploaded your .apk file, you will need to hit the "submit update" button that is kinda hiding in the upper right hand corner of the page. This will submit your apk and store page for review by the google-bots. The first one takes 12-24hrs, but subsequent updates take 1-3hrs.
Once your first .apk has been published, you are still not done quite yet. Due to a bug in the system, you will need to upload a new .apk as soon as you can, but this time you want to add an expansion file. The expansion file will be the .obb file that will be in the same directory as your packaged distribution build. When you upload your .obb file, google will complain that it is very large, and you should use a .zip file format. DO NOT LISTEN TO THEIR LIES. For my particular experience with them, the .zip file format for the .obb file prevented the app from launching on any phone the app was downloaded to. Just ignore it and try to do some heavy optimization later to shave off some of that file size.
Finally, there is the option on the APK page to include test communities through google+ and google groups. This is pretty useful since this way you don't have to email the tester link to every single person. The link that gives testers access to the app is also found in the "Manage List of Testers" window. Remember, this thing takes almost a day to update for the first upload, and at least a couple hours for subsequent updates, so be patient.
Well, hope this tutorial helps save you guys some time and effort on something that I feel like should be a little bit more straight forward. If there is any confusion or if this tutorial is lacking/hard to understand, please leave feedback and I will try to amend it.
No comments:
Post a Comment